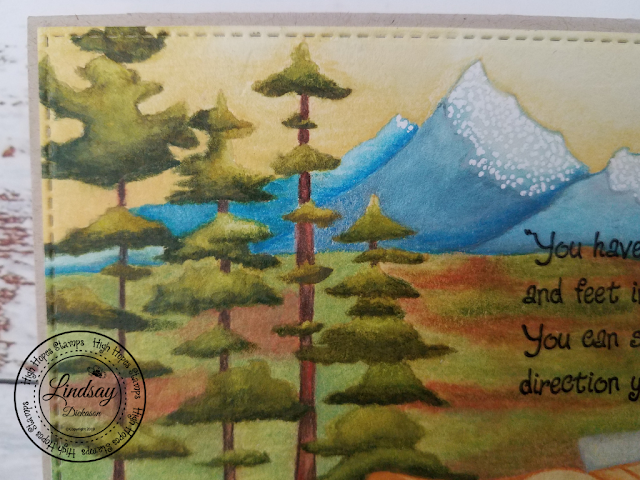
So last week I shared a masking technique that I used to create a scene card, and that's what I did with this one as well. But I'm also going to share another technique you can use to achieve the same look. First, I stamped Ron's Royce and masked the front part of the card. Then, I stamped the Forest. Lastly, I stamped the Mountains. How do know what to stamp first to get the look you're going for? Always stamp "front to back," meaning that whatever you stamp first will appear in front of whatever you stamp next. So, because I wanted Ron's Royce to be in the foreground, I stamped it first and masked it off so I could then stamp the Forest.
Now as you can see, the Forest is in front of the Mountains, but I actually didn't do any masking for the trees. I didn't because it has some pretty small nooks and crannies, so I didn't want to take the time to cut out a mask. So, when I inked up the Mountains stamp I actually just took my finger and wiped away the ink off the stamp on the part that would overlap the trees. This "wiping" trick worked out so well for this card because I was stamping in a very light color of ink, and because the Mountains stamp isn't a very intricate shape, so I would be able to recreate mountains behind the trees very easily without any guidelines from the stamp. If I were stamping in a dark color of ink and overlapping two very intricate stamps, then I might consider using the masking technique over the "wiping" trick. The former will definitely give you more control over the finished design, but the latter is quick and easy, doesn't require any special products, and in a lot of cases works just as well.
After the stamping, I took out my Prima Watercolor Confections Decadant Pies watercolor palette and #2 round watercolor brush. I'm still very new to watercolors, but what I've discovered so far is that you just don't have as much control over the color as you do with markers or pencils. But that's kinda the desired effect I wanted with this card - more of a looser interpretation of the nature scene in this scene. Watercolor lends itself very well to a nature scene. Nature is imperfect so watercolor's looseness is a good match for creating more of the feeling of nature, rather than photo-realism.
However, once I was done with the watercolors, I just had this itching feeling that this project needed a little more definition than what I could achieve with my current watercolor skills. So, I completely dried the project with my heat tool, and then went over specific areas to make them pop out more and define the lines a little more. I also took a white gel pen and added some snow details to the mountains in the back. I really contemplated adding in some flowers into the meadow in this scene, but I feel this card emotes a more masculine feeling so I decided to leave them out of this project.
I stamped the Any Direction You Choose sentiment in black archival ink and added a faux stitched edge with a metal die and my die cutting machine. Then, I mounted the whole thing onto a kraft card stock card base with strong adhesive tape.
And that's all she wrote! I'm really proud of myself for taking a chance on something new, so I'm really proud of this project. I definitely will be pulling out my watercolors more often! Are you asking yourself, "But Lindsay, on what occasion would you give out this card?" Well - thanks for asking - I turn cards like this (ones with quotes or other inspirational messages) into a card for just about any occasion! So for this card, I plan on giving it out for a birthday, and I'll just write "Happy Birthday" on the inside. And I'm good with that!
Well, thank you all so very much for stopping by the blog today. And remember the "Get Well Soon" release is now available in the High Hopes shop! The adorable critters in this release are sure to put a smile on anyone's face! I hope you all have a wonderful weekend, and I'll see you next week!!!
Supplies Used:
Mini MISTI [Scrapbook.com]
Antique Linen Distress Ink [Scrapbook.com]
Indadinkadoo Masking Paper [Scrapbook.com]
Prima Watercolor Confections Decadent Pies [Scrapbook.com]


No comments:
Post a Comment
Thank you so much for commenting!
Note: Only a member of this blog may post a comment.